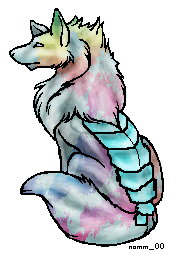
Dray-colouring Tutorial... thingie.

Come and show off your masterpieces!

Moderators: Mystic Dragon, Xalia, Shard, Dray

Post Reply
User avatar
Dray
Dracolich
Posts: 9389
Joined: Wed Jul 06, 2005 11:16 am

Dray-colouring Tutorial... thingie.

Post by Dray »

XD DNS asked if I could take some screenshots of various stages of colouring, so here they are. I apologize if they're a bit hard to follow, but making a full-fledged tutorial is very time consuming!

Anyways... I do all of my resizing, etc. in photoshop, so here we go.
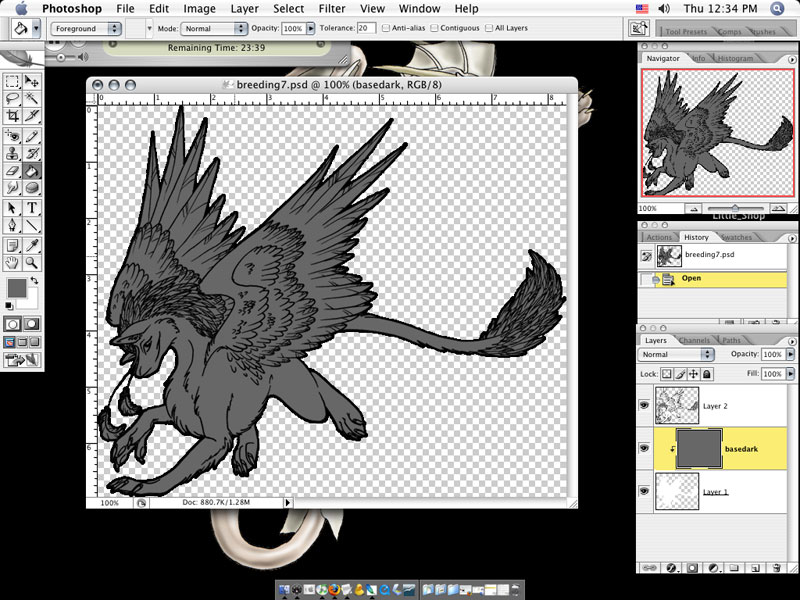
Image

First I resize my image to the dimensions I'm going to be adopting it out at, delete the white around the outside of the outline, and set up a system where the white bottom layer contains all of the inside colours. (This means that I can 'go out of the lines' and it won't show up outside the outline.) This image is the first, most basic step after resizing, whitening, etc.
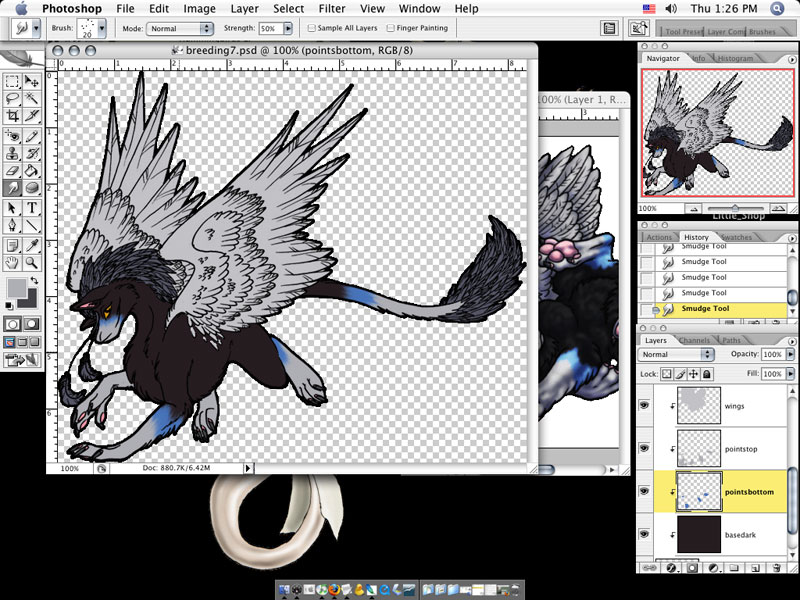
Image

I fill out any sections that will be different colours on different layers, so they're easier to change if I need to do so.
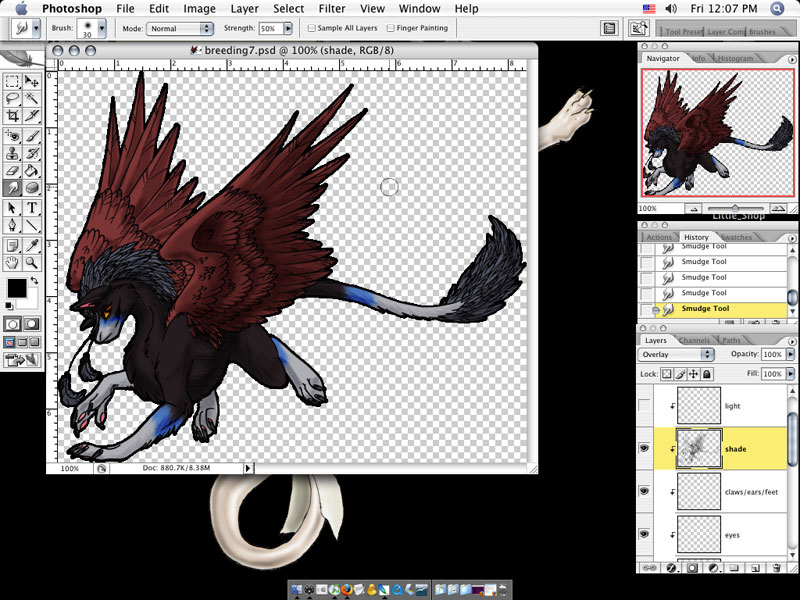
Image

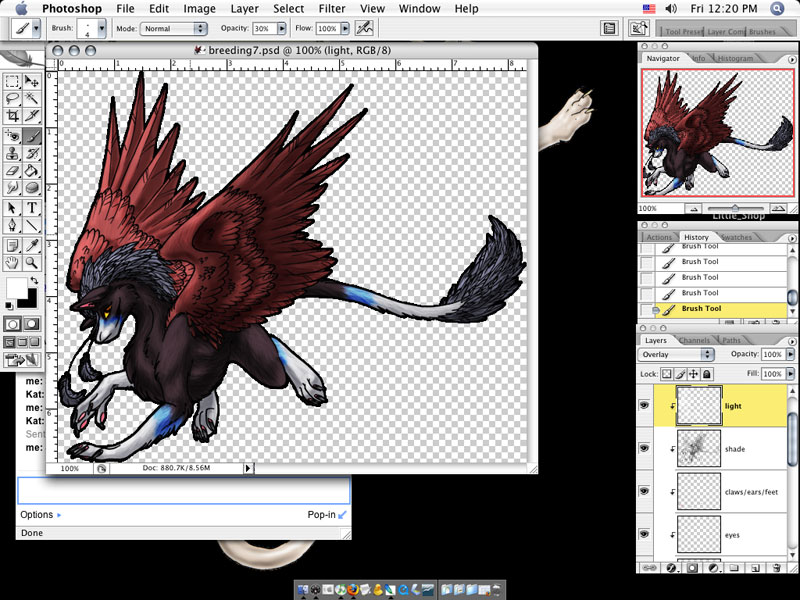
I then create a new layer for shading, and a new layer for lighting, and set both to 'overlay'. Here's the shade-only version, using a special brush at about 30% opacity and only smudging on occasion. (I changed the colour of the wings so I could see to shade it better.)
Image

Here's the image with the shading and the lighting, both using 30% opacity brushes.
Image

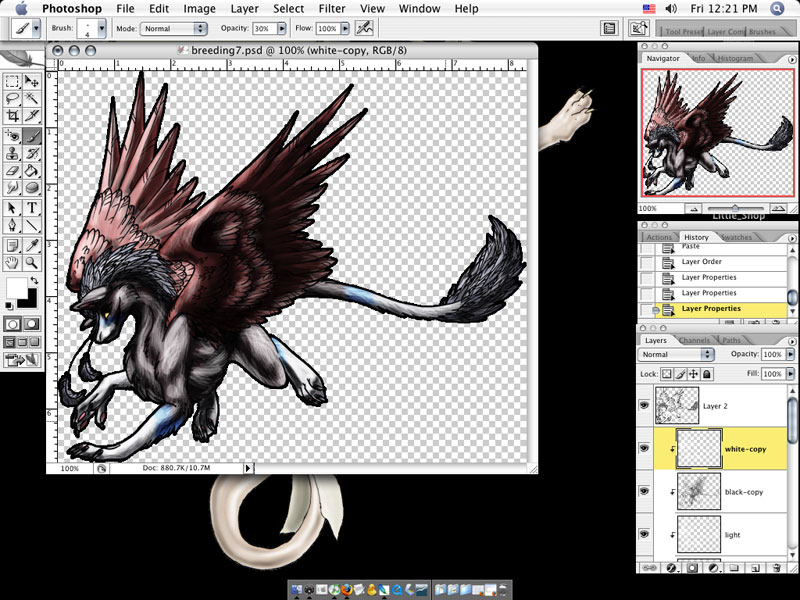
Now I take the shading and lighting layer and make copies of both, leaving them at 'normal' instead of 'overlay'.
Image

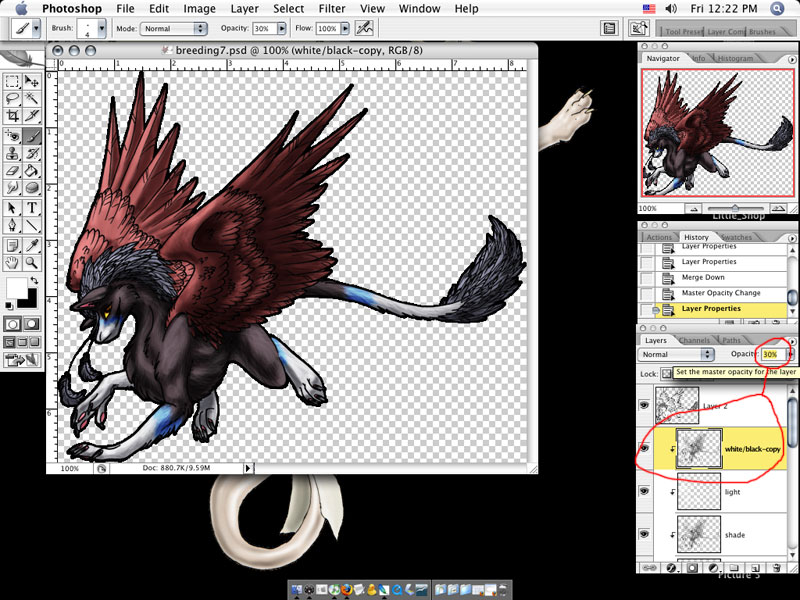
I merge the black and white copies together and set the opacity of this new, merged layer to about 30%. The reason I do this is so that on very light coloured templates, the shading still shows up--something that doesn't work when you're only using overlay.
Image

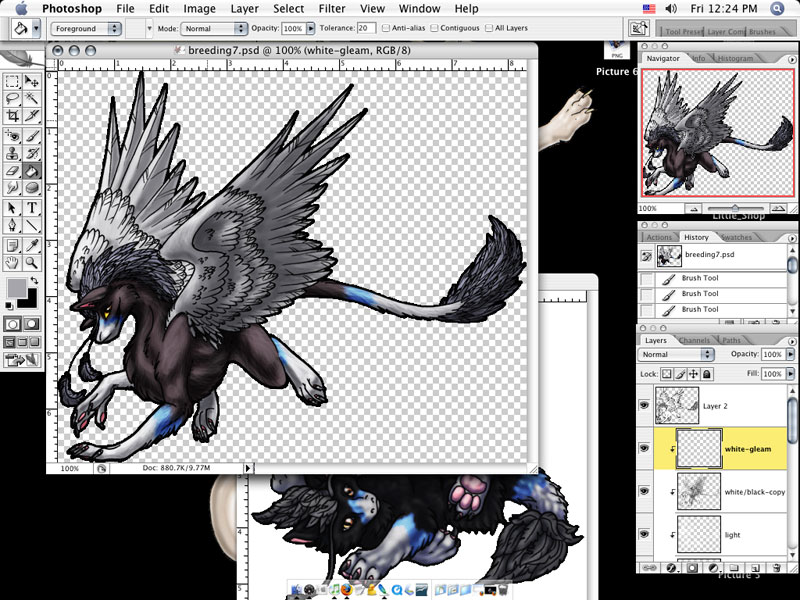
All I've done here is add some gleam to the image's eye and claws, and changed the wings back to their proper colour.

TAH DAH THE END! :D

Credits:
Template drawn by Unyko
Coloured by Dray
Merket was created by Silver Midnight (as was the hatchling image that's sometimes visible.)

Variations of this template will be given away from Kalyturn's Hybridization Center.

:3
User avatar
DNS
Ancient Dragon
Posts: 3852
Joined: Mon May 15, 2006 3:47 pm
Location: On top of the rainbow
Contact:

Post by DNS »

-hugcling- OMGYOUROCKTHANKYOU. ;-;

I actually learned a lot with that. I've just been burning and dodging for my shading. Is it a special brush you downloaded, or a brush set to 30 opacity and 4 pixils? and also, what color do you use, gray?

-huggles- whee this is awesome. I'll have to try this next time i have something to colour. It seems to be a LOT better for various values. ^^ thankyou.

also, when will taht template be available? though for the moment, i'm content with gurgling at the tutorial. <3
JKatkina
Ancient Dragon
Posts: 2418
Joined: Wed Jul 06, 2005 12:37 pm
Location: Canadia
Contact:

Post by JKatkina »

Hee! I can answer these. I do my shading almost exactly the same way.

It's a brush set to 30% opacity. Size varies for whatever you need; use smaller or larger where appropriate.

For the dark parts of the shading, just use pure black. For the highlights, just white. :3 That's why it's not full opacity -- so the white and black don't overwhelm.
Image Image Image Image
User avatar
Dray
Dracolich
Posts: 9389
Joined: Wed Jul 06, 2005 11:16 am

Post by Dray »

The brush is one that I made myself, taking various sized pixel-spots and using the 'Edit -> Define Brush Preset' to create a new brush.

Image

This is the original size, if you'd like to gank it. It makes a mean fur-stroke, if you set the spacing to zero.

I shade with black and white, which makes things much, much easier to shade an image quickly.
User avatar
DNS
Ancient Dragon
Posts: 3852
Joined: Mon May 15, 2006 3:47 pm
Location: On top of the rainbow
Contact:

Post by DNS »

oh~ XP Oh wow, that's a duh moment. I should've connected that myself. <3 thanks jkat. ^^

and ah. Useful. I'll have to figure out how to make brushes, but it doesn't seem that hard, so yes. Thanks, dray. -saves that dot image-
Shiolar
Dragon
Posts: 1814
Joined: Sun Oct 17, 2021 12:28 pm

Post by Shiolar »

Heee... that's almost the same method I use for my colouring and shading, oddly enough. I don't merge my shading layers, and I have different sets of layers for different parts of the dragon (fur, feathers, scales, hide, wing membranes, horns and claws, etc)... But yeah, very almost the same.
User avatar
Dray
Dracolich
Posts: 9389
Joined: Wed Jul 06, 2005 11:16 am

Post by Dray »

I leave the original light and dark layers alone, but merge the secondary black&white layers so that if I want to do something like opalescence, I can copy /that/ layer and fiddle with the copy however. >3~ It makes for some funky effects, that way. (Just learned that from JKat, myself.)
User avatar
Mystic Dragon
Great Wyrm
Posts: 2290
Joined: Wed Jul 06, 2005 11:37 am
Location: Tris'Hath
Contact:

Post by Mystic Dragon »

Are you using a tablet for this? If so, could the shading stages work with a mouse as well?

Also, will this work in PS:CS?
https://renaissancebookpress.com/2017/0 ... tlin-caul/" onclick="window.open(this.href);return false;
User avatar
DNS
Ancient Dragon
Posts: 3852
Joined: Mon May 15, 2006 3:47 pm
Location: On top of the rainbow
Contact:

Post by DNS »

having used cs, it probably should work in it-- I mean, it's pretty basic things. Layers, brushes, opacity, merging layers, and layer settings, all of which are basic photoshop functions. :/ only someone who uses cs frequently would know, though, for sure. X.x ^^;
User avatar
Mystic Dragon
Great Wyrm
Posts: 2290
Joined: Wed Jul 06, 2005 11:37 am
Location: Tris'Hath
Contact:

Post by Mystic Dragon »

@.@ Oh geez. I really hope this tutorial helps. I wanna make my avy all spiffy and shaded!
https://renaissancebookpress.com/2017/0 ... tlin-caul/" onclick="window.open(this.href);return false;
User avatar
Dray
Dracolich
Posts: 9389
Joined: Wed Jul 06, 2005 11:16 am

Post by Dray »

Nope, I do all of this with a mouse, and I work in CS2 which is only slightly changed from CS. :) It should all work for you--if you want clarification on anything then just poke me about it and I'll try to explain better.
(Yay, colour-y avatar!)
User avatar
Silver Midnight
Dragon
Posts: 754
Joined: Fri Nov 25, 2005 2:26 pm
Location: Poisoning the donuts.
Contact:

Post by Silver Midnight »

I want one. ;_;
Still gaming? Take a look at Atonement RPI.
User avatar
Dray
Dracolich
Posts: 9389
Joined: Wed Jul 06, 2005 11:16 am

Post by Dray »

Click on the link on my sig, fill out a form and email it to me. XD that's all it takes!
User avatar
DNS
Ancient Dragon
Posts: 3852
Joined: Mon May 15, 2006 3:47 pm
Location: On top of the rainbow
Contact:

Post by DNS »

hmm. I tried this, but for me, it doesn't get very light? and when it does, it gets too light, and so on. am i missing something?

I also tried it with setting the shading and lightng layers to screen and multiply, and colouring with a ten percent brush-- which worked well, except that the shading made all my colours kind of grayish, when i wanted them more vivid. Does anyone know a way around that?

edit== observe. shoddy 15 minute example of that last one, with the shading layer on 60% opacity:

Image

even on sixty, it still eats my colours a little. :/ anything else and it's too light.

with the first problem, opacity limits how light it can be, which is somewhat solved when you duplicate the layer, but then it's too light. :/ maybe i'm doing something wrong?

[note,. that lineart belongs to someone on neopets. It's a makeable of a lupe. ^^]
User avatar
Dray
Dracolich
Posts: 9389
Joined: Wed Jul 06, 2005 11:16 am

Post by Dray »

If you want something really vibrant, try transparency-locking the normal layer, and colouring over the white with a coloured brush that's on the colour dodge or overlay setting? It'd be a pain to do for each blotch of colour, but I don't think that there's one fix-all for that kind of pattern.
User avatar
DNS
Ancient Dragon
Posts: 3852
Joined: Mon May 15, 2006 3:47 pm
Location: On top of the rainbow
Contact:

Post by DNS »

-nodnod- that would be a pain in the ass.. maybe i could put it on a new layer and kill the master opacity of that layer? or do low opacity and layer-style colour overlay everything.. eh.

:/ I can't get the vibrancy you've got with your method, though.. which means i must be doing soemthing wrong~ ah well, i'll keep at it, and hopefully get it.
User avatar
Mystic Dragon
Great Wyrm
Posts: 2290
Joined: Wed Jul 06, 2005 11:37 am
Location: Tris'Hath
Contact:

Post by Mystic Dragon »

Okay, I tried following the steps but I have no frickin' clue what "set up a system where the white bottom layer contains all of the inside colours" means.
https://renaissancebookpress.com/2017/0 ... tlin-caul/" onclick="window.open(this.href);return false;
User avatar
Dray
Dracolich
Posts: 9389
Joined: Wed Jul 06, 2005 11:16 am

Post by Dray »

DNS, it could just be because you're shading something that's light-coloured. In that case, try making the shade layer 'multiply' and make it a blue-purple colour, and then make the light layer 'screen' and make it a lighter version of what the base colour is?

Mystic, I'll do a screen-capture of raw-scan to how I start off, if that'll help. :3
User avatar
Mystic Dragon
Great Wyrm
Posts: 2290
Joined: Wed Jul 06, 2005 11:37 am
Location: Tris'Hath
Contact:

Post by Mystic Dragon »

Oookay... I'm doing good so far. I've been able to follow most of your steps dead on... except for a few minor tweaks here and there. However, I have a question about the shading aspect. I can get it to smudge fine, but it remains one, even tone. I can't get the shadow depth I need. How do you darken (and/or lighten) it?
https://renaissancebookpress.com/2017/0 ... tlin-caul/" onclick="window.open(this.href);return false;
User avatar
Dray
Dracolich
Posts: 9389
Joined: Wed Jul 06, 2005 11:16 am

Post by Dray »

Oh sweeet! XD I'd lost my 'fur' brush and now I've found it again! *kisses old tutorial and nabs zat brush-blob*
Guest

Post by Guest »

Mystic Dragon wrote:Okay, I tried following the steps but I have no frickin' clue what "set up a system where the white bottom layer contains all of the inside colours" means.
Dray, is there anyway you could still the raw scan start screen capture thing, cause I am not understnading that part as well
User avatar
Dray
Dracolich
Posts: 9389
Joined: Wed Jul 06, 2005 11:16 am

Post by Dray »

How do you mean, Feral? From the point of scanning to the first tutorial image?
Guest

Post by Guest »

I don't know what this means: set up a system where the white bottom layer contains all of the inside colours..the coloring out of the lines but it not showing thing...I'm none too sure how to do that..
I have PhotoshopCS2 just in case that might help
User avatar
Dray
Dracolich
Posts: 9389
Joined: Wed Jul 06, 2005 11:16 am

Post by Dray »

Same program as I'm using, yep. ^_^

Uh... how about I throw together a breakdown of how to do that part on Friday? I'm working tonight and all of tomorrow so I don't really have a good chunk of time to sit down and work through a tutorial, but I'd be more than willing to snap pictures and go through the process, if you'd like!
Guest

Post by Guest »

Sweet!! And take as long as you need/want. Thankz a ton Dray!
Post Reply